
How to Migrate Magento Attributes to Shopify Metafields (3 Methods)
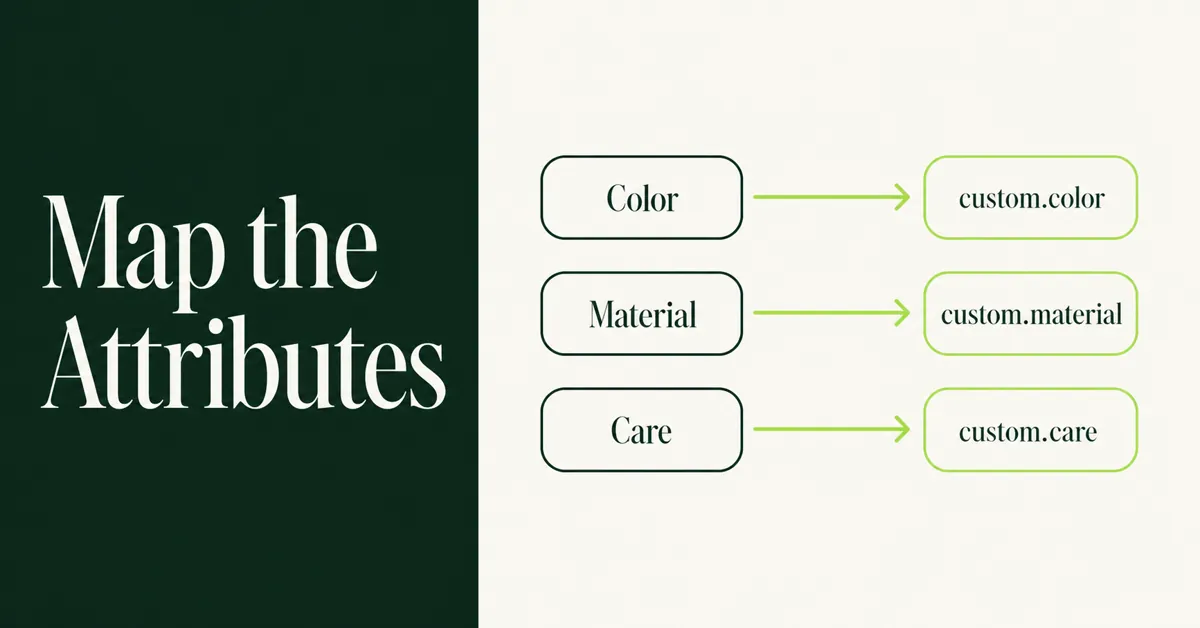
To migrate Magento attributes to Shopify metafields in 2026, sort each Magento field into one of three buckets: a variant option (buyer chooses it), a product metafield (specs and care data), or skip (legacy noise). Then create Shopify metafield definitions, load values with Admin, CSV, or a migration app map, and connect those fields in the theme so they actually show on the product page.
This guide is the attributes job only. For the full Magento cutover (configurables, reviews, customers, redirects), use the Magento to Shopify migration complete guide. For post-move cleanup of duplicates and tags, see how to clean up product data after a Shopify migration.
Jump to a section
- What Magento attributes become on Shopify
- Method 1: audit + metafield definitions in Shopify Admin
- Method 2: CSV / Matrixify-style bulk metafield columns
- Method 3: migration app mapping
- How to verify and display metafields on product pages
- Common failures (attribute sets, dropdowns, multi-select, store-scoped attrs)
Most Magento attribute sets should be deleted or collapsed before import, not copied 1:1. Shopify does not have attribute sets. Carrying every unused EAV field into metafields only recreates Magento debt on a cleaner platform.
What Do Magento Attributes Become on Shopify?
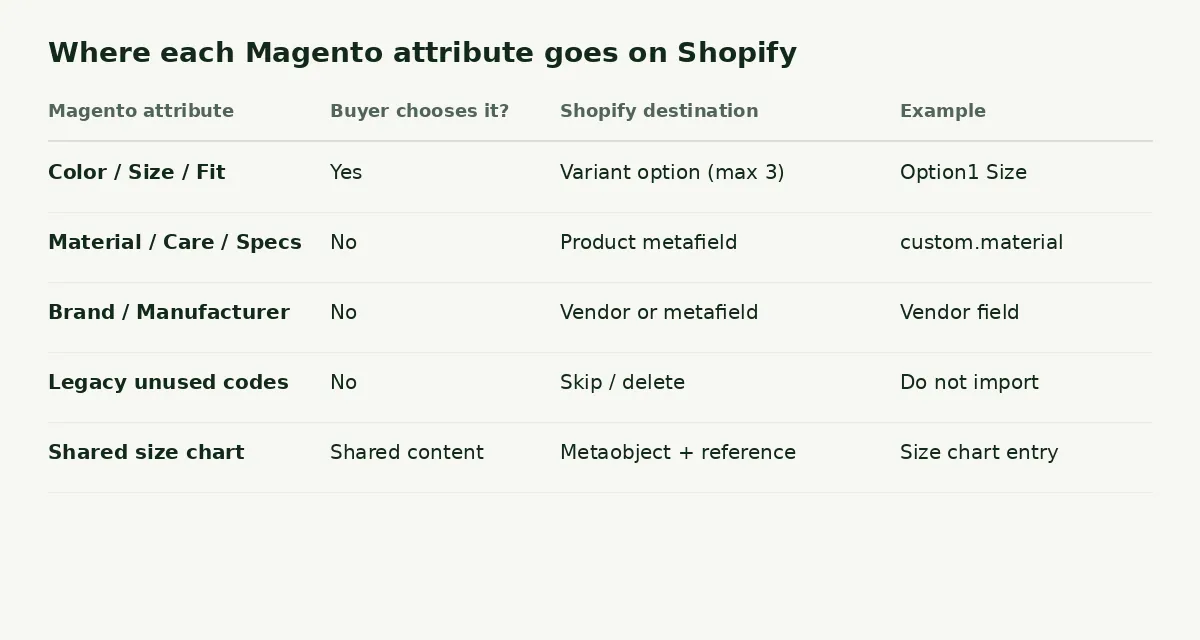
Purchase-choice Magento attributes become Shopify variant options. Specs, care text, and other static product data become Shopify metafields. Shared content such as a size chart belongs in a metaobject, not a duplicated metafield on every SKU.
Magento stores catalog data in an Entity-Attribute-Value model. You manage attributes under Stores > Attributes > Product and group them into attribute sets under Stores > Attributes > Attribute Set, per Adobe Commerce product attribute docs and the attribute sets guide.
Shopify is flatter. A product has core fields, up to 3 option types and 2,048 variants, plus typed metafields. Metafield definitions live in Settings > Metafields and metaobjects (also labeled Custom data in some admin paths). Shopify documents up to 250 metafield definitions per store.
Use this sorting rule before you export anything:
- Variant option: the shopper must pick it to buy (size, color, pack size). Cap is 3 option names per product.
- Product metafield: material, ingredients, care, wattage, country of origin, compliance notes.
- Vendor / type / tags: brand-like fields that already have a native Shopify home.
- Metaobject: one reusable size chart, warranty block, or certification shared by many products.
- Skip: empty attributes, old ERP codes nobody reads, store-view-only experiments.
If a Magento configurable uses more than three axes, keep the three that change price or inventory as variants. Park the rest as metafields or rebuild extras with an options app after cutover. That is a different job from this metafields guide.
Method 1: How Do You Audit Attributes and Create Shopify Metafield Definitions?
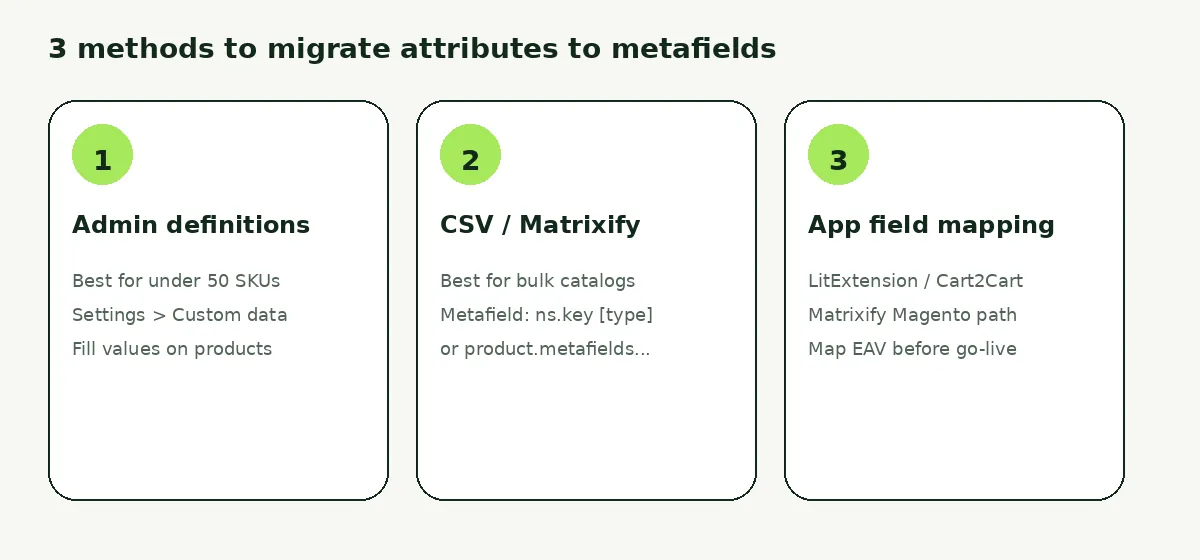
Export Magento attributes, decide the destination for each one, then create matching metafield definitions in Shopify Admin before you load values. Method 1 fits catalogs under roughly 50 SKUs, or any store that needs a clean mapping sheet first.
Step 1. Export Magento attribute inventory
In Magento Admin go to System > Data Transfer > Export, set Entity Type to Products, and export CSV, following Adobe data export docs. Also open Stores > Attributes > Product and list every custom attribute code, input type, and which attribute sets use it.
Build a simple mapping spreadsheet with columns for Magento code, label, input type (text, dropdown, multi-select, yes/no), store scope, and Shopify destination (variant option, metafield namespace.key, vendor, skip).
Step 2. Collapse attribute sets
Magento attribute sets do not exist on Shopify. If you have separate sets for Apparel, Home, and Clearance with overlapping Color and Material fields, merge them into one naming plan: custom.color, custom.material, custom.care_guide. Delete or skip attributes that are blank on more than about 80% of products. That prune step is the hot take in practice: fewer definitions beat a perfect 1:1 clone.
Step 3. Create metafield definitions in Shopify
From Shopify Admin:
- Go to Settings > Metafields and metaobjects.
- Open Product metafields (or create from a product page Metafields section with Add definition).
- Click Add definition.
- Prefer a Shopify standard definition when one exists (care guide, color, and similar).
- For custom fields, set Name, Namespace and key (example
custom.material), type (single line text, multi-line text, integer, decimal, list, boolean), and validations. - Enable storefront access if the theme or Storefront API should read the value.
- Save. Repeat for each kept Magento attribute.
Shopify's walkthrough for care instructions follows the same Admin path: definition first, values on products, then theme connection. See Shopify's metafields tutorial and creating custom metafield definitions.
Step 4. Enter values on a test set
Open 10 to 20 products in Shopify Admin, scroll to Product metafields, and paste values from Magento. Confirm types match (numbers stay numbers; multi-select Magento values become a list type, not a single text dump). When the sample looks right, move to Method 2 for bulk load.
Type mapping cheat sheet
Match Magento input types to Shopify metafield types before you import, or validation will reject rows.
- Text / Textarea: single_line_text_field or multi_line_text_field
- Dropdown / Select: single_line_text_field with preset choices, or a metaobject reference if values are shared
- Multiple Select: list.single_line_text_field
- Yes/No: boolean
- Price / Weight-like decimals: number_decimal (or native weight fields when Magento weight maps to Shopify weight)
- Date: date or date_time
- Media / file: file_reference after files live in Shopify Content > Files
Adobe's attribute create flow still starts at Stores > Attributes > Product with an input type and storefront properties. Shopify's parallel step is the metafield definition type picker. Getting those two lists to agree is half the migration.
Method 2: How Do You Bulk Load Magento Attributes With CSV or Matrixify?
Use Shopify's product CSV or Matrixify when you have hundreds of products and a finished mapping sheet. Create metafield definitions first, then import columns that match the namespace and key exactly.
Shopify native product CSV
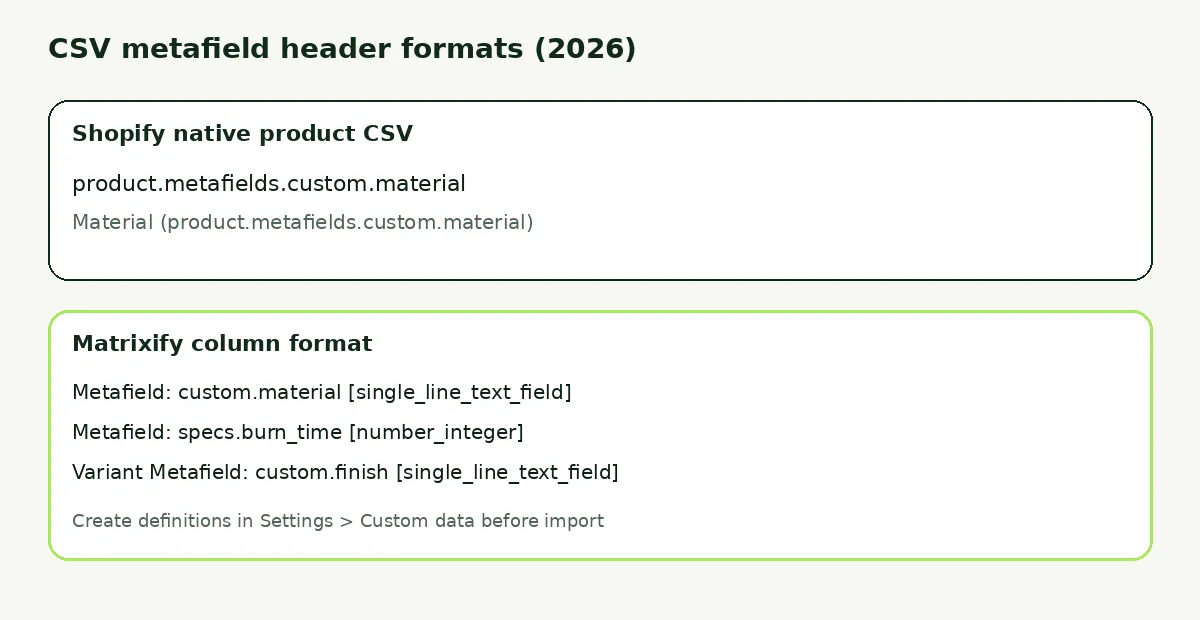
After a product metafield is defined, Shopify includes it on product CSV export/import. Official column formats are product.metafields.namespace.key or a labeled form such as Material (product.metafields.custom.material), documented in Shopify's product CSV guide. Find namespace and key under Settings > Custom data / Metafields and metaobjects > Products.
Native CSV supports product metafields for many types (text, numbers, dates, references, lists). Variant metafields are not supported on the native product CSV. Use the variant bulk editor, Matrixify, or the Admin API for variant-level fields.
Practical CSV workflow:
- Export products from Magento (System > Data Transfer > Export).
- Build or export a Shopify product CSV with Handle and Title intact.
- Add one column per metafield using the official header format.
- Map Magento attribute codes into those columns. Keep dropdown option labels consistent.
- Import with overwrite for matching handles if you are updating an existing catalog.
- Spot-check 20 products in Admin.
For general CSV hygiene (handles, images, options), pair this with how to import products to Shopify from a CSV file without errors.
Matrixify-style columns
Matrixify's metafields documentation uses headers like Metafield: namespace.key [type], for example Metafield: custom.material [single_line_text_field]. Variant fields use Variant Metafield: namespace.key [type]. Empty cells delete existing metafield values on import, so omit a column when you want to leave data alone.
Matrixify also reads Magento export files on its Magento migrate path and can write custom fields as metafields during product import. That makes it a bridge between Method 2 and Method 3 when you want spreadsheet control.
Method 3: How Do Migration Apps Map Magento Attributes to Metafields?
Use a migration service when you need products plus customers/orders in one project, or when Magento EAV is too messy for a weekend CSV. Apps do not remove the mapping decision. You still decide variant vs metafield vs skip.
What serious Magento to Shopify tools usually offer:
- LitExtension / Cart2Cart: automated product move with optional custom field mapping. Cart2Cart documents a Custom Fields and Metafields custom migration for Magento EAV attributes that must become Shopify metafields with explicit namespaces and keys.
- Matrixify: Magento file understanding plus metafield columns, good when you want to clean Excel before push.
- URL product importers: tools that copy public product pages (title, description, images, variants, price, SKU, tags, vendor, type) do not rebuild Magento EAV attribute tables. Magento admin attributes that never appear on the storefront HTML will not magically become metafields. Treat those apps as catalog starters, then run Method 1 or 2 for metafields.
App mapping checklist:
- Export Magento attribute codes and sample values.
- Create Shopify metafield definitions that match the target keys the app will write.
- In the migration wizard or custom mapping sheet, point each Magento attribute to namespace.key or to a variant option.
- Run a demo on 20 to 50 products.
- Verify types (multi-select to list, decimal to number_decimal, yes/no to boolean).
- Only then run the full catalog.
Migration apps also leave gaps that are not metafield jobs: reviews need a CSV into a review app (see how to import Magento reviews to Shopify), and many store settings never move at all (see what a Shopify store migration app does not move). The same honesty applies across platform switches like WooCommerce to Shopify product transfer: custom fields are a mapping project, not a checkbox.
How Do You Verify and Display Metafields on Product Pages?
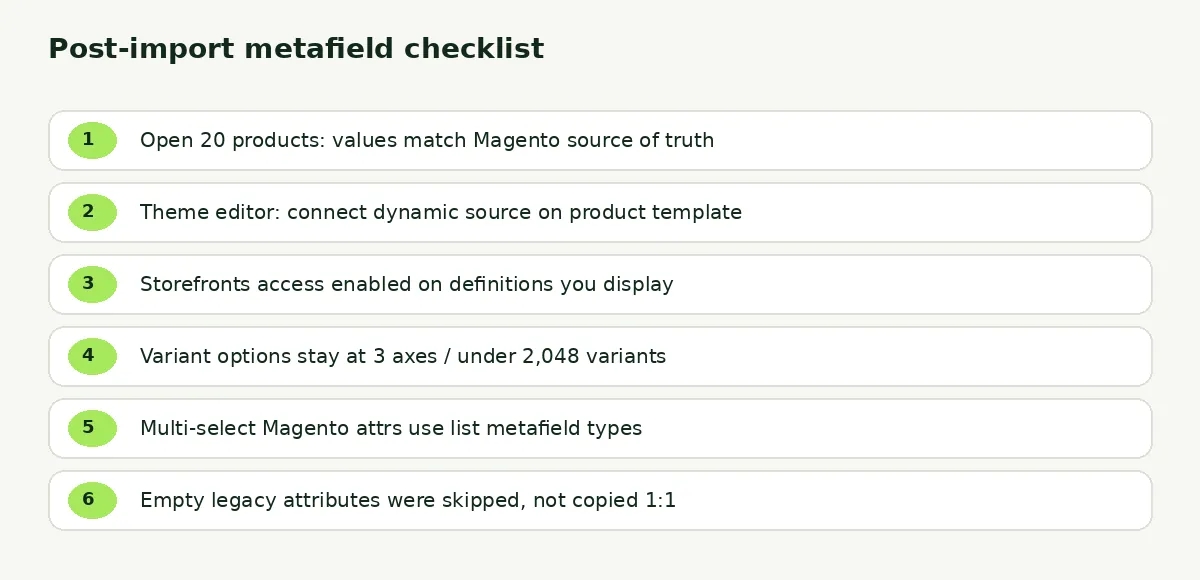
Metafields stay invisible on the storefront until the theme reads them. After import, connect each definition in the theme editor (or Liquid), then spot-check products against Magento.
Connect in the theme editor
On Online Store 2.0 themes:
- Go to Online Store > Themes > Edit theme.
- Open the product template.
- Add a block that supports dynamic sources (for example a collapsible row or rich text block).
- Click the connect dynamic source icon and select the metafield.
- Save. Confirm the section hides cleanly when a product has no value.
Shopify documents this flow in displaying metafields on your online store. If your theme lacks dynamic sources for a type, hire a partner or add Liquid such as {{ product.metafields.custom.material.value }}.
Verification checklist
- Compare 20 Magento products to Shopify Admin metafield values.
- Confirm storefront rendering on desktop and mobile.
- Check filters if you planned Search and Discovery facets on metafields.
- Confirm variant option count is still at most 3 and variant rows at most 2,048.
- Search for leftover Magento attribute codes pasted into descriptions by accident.
If you sell in multiple Magento store views today, freeze one migration locale for metafield text (usually the default store view). Translate later with Shopify Markets and translated metafield values. Trying to flatten every store-view string into one metafield on day one is how catalogs ship with mixed languages on a single product card.
What Common Failures Happen When Migrating Magento Attributes?
Most failures come from copying Magento structure instead of Shopify structure. Fix the mapping, not the theme.
- Attribute sets copied 1:1: Shopify has no sets. Collapse overlapping fields before import.
- Dropdowns imported as free text: use single-line text with validations, or a metaobject/list of values, so admins pick from a list.
- Multi-select flattened wrong: Magento multi-select needs a Shopify list type (for example list.single_line_text_field), not a comma stuffed into one text field if you want clean filters later.
- Store-scoped attributes: Magento store-view values do not map to Shopify Markets automatically. Pick the default store view as source of truth, or plan Markets plus translated metafields separately.
- Fourth variant axis forced into options: Shopify still allows only 3 options. Extra axes become metafields, split products, or an options app.
- Definitions created after import: values can land as metafields without definitions, which limits some types and Admin UX. Create definitions first.
- Blank CSV cells wiping data: on Matrixify, empty metafield cells delete values. Omit columns you are not updating.
- Theme never connected: Admin looks fine, storefront looks empty. Always wire dynamic sources.
Which Method Should You Use to Migrate Magento Attributes to Shopify Metafields?
Pick Method 1 when the catalog is small and you need a clean audit. Pick Method 2 when the mapping sheet is done and volume is high. Pick Method 3 when Magento EAV, orders, and customers share one migration project and you still review the attribute map on a demo store first.
Do the prune before any of the three. A Magento store with 120 attributes often needs 15 to 30 Shopify metafields plus a few variant options. That smaller set is easier to maintain, easier to display, and closer to how Shopify themes and apps expect structured data to work.
When the metafields are live, circle back to the wider Magento migration checklist: variants, reviews CSV, customer password resets, and 301s. Attributes are one job. Finishing that job well is what keeps product pages informative after Magento is offline.
Related Articles

Magento to Shopify Migration in 2026: Checklist, Data Map and Redirects
Magento to Shopify migration in 2026: Adobe support deadlines, what moves and what stays, which tool fits, a 301 redirect map, and a phased checklist.
How to Import Magento Reviews to Shopify (3 Methods)
Leave Magento reviews behind and conversion drops. Export a CSV, map those columns, and import Magento reviews to Shopify using three working methods.
Shopify Store Migration App: What It Does Not Move in 2026
The Shopify Store Migration app imports products and customers only. See what it does not move in 2026, plus how to run the official importer correctly.

How to Import Products to Shopify from a CSV File (Without Errors)
Learn how to import products to Shopify from a CSV file without errors. Covers formatting, variants, images, and detailed fixes for every common issue.

How to Clean Up Product Data After a Shopify Migration (Duplicates, Variants, Tags, and More)
Duplicate products, broken variants, orphaned metafields? Here's how to clean up product data after a Shopify migration, fast and without wrecking SEO.

WooCommerce to Shopify Migration: Step-by-Step Product Transfer Guide
Planning a WooCommerce to Shopify migration? This step-by-step guide covers product transfer, CSV cleanup, SEO protection, and avoiding data loss.